Basic Principles of Abrasive Blasting
Introduction
This guide has been compiled to assist you to identify ways to make your life as a Blaster easier and more efficient. Some of the topics covered may seem common sense to you. In fact, you may have been practicing them for some years.
In our country however, most Blasters have never had any specialist training. The following usually applies:
Who trains the Blaster? The old Blaster.
Who trained the old Blaster? The Blaster before him.
This is sad but true. No new techniques or improved equipment were ever investigated. Fortunately this is now changing. By just using a few of the ideas in this guide, you should be able to improve your production and efficiency. The result of these improvements will flow directly into lower costs and higher profits for you the contractor.
Abrasive Blasting Overview
There a three major reasons for abrasive blasting. Essentially they all involve using compressed air to propel an abrasive towards a surface to achieve the desired effect.
Surface Preparation
Widely known as blast cleaning, its primary objective is to remove old coatings, rust and other contaminants from steel. In the case of new steel, its purpose is to remove mill scale which forms during the manufacturing process. Its second major function is to create a surface profile, which is the result of the abrasive particles impacting the blasted surface. Coating manufacturers generally specify a specific profile to which their particular product would be applied to.
Surface Finishing
Surface finishing differs from surface preparation in that the desired result of abrasive blasting is to improve the appearance of and utilization of a product rather than condition it for coating. Examples of this application include removal of production contaminants, de-burring of moulds and formed parts, inspection blasting and blasting to enhance a products original features.
Surface Hardening
Hardening or shot-peening of a surface by abrasive blasting is a specialized field that has become essential to the life of high stress components. In effect, shot-peening stretches and compresses the surface. Increased fatigue strength of metal is achieved by bombarding the surface with a high-velocity stream of pre-selected round balls. Steel shot and glass beads are the most prominent abrasives used for this application.
Personal Safety
Dust, noise, high pressures and flying debris all contribute to a highly hazardous working environment. Personal safety is critical and short cuts could prove fatal.
Standard safety equipment (Safety Boots, Eye Protection, Dust Masks, Overalls, Leather or Rubber Gloves and Earplugs) should be worn by all in the immediate vicinity of the operation. In addition to the above, the following are to be worn by all blasters.
Blast Suits
These suits are rugged in design are reinforced with leather to protect the blaster from abrasive ricochet. They also feature buckles on the sleeves and pants to keep dust out.
Air-Fed Blast Helmets
An air-fed helmet is designed to protect your life. It prevents you breathing any dust, protects your face from flying particles and offers hard-hat protection. In addition to this, a light-weight helmet reduces fatigue which could lead to a lapse in concentration.
Operators Breathing Equipment (OBE)
An OBE is an air filtration system designed to purify the Blasters breathing air. It is coupled to the air-fed helmet and removes oil mist, water vapour, odors and debris. It must be noted that it does not remove Carbon Monoxide. Specialized monitoring equipment is available to detect toxic gasses.
Air Compressors
A compressors power output is measured in pressure and volume. This can be expressed as follows:
| Imperial | Metric | |
|---|---|---|
| Pressure | Pounds per square inch (PSI) | Bar |
| Volume | Cubic feet per minute (CFM) | Cubic meters per hour or minute |
It is one thing to have high pressure, but another thing to maintain that pressure with an open end. So when it comes to abrasive blasting, it is vital to understand that one can only have the correct amount of pressure if one has the volume of air to back it up with.
An increase in pressure will increase the volume of air flowing through the nozzle. If the compressor does not produce the volume of air required by the nozzle, it will never achieve the required pressure and result in a lack of production. With this in mind it is important to know that air delivery should not exceed 80% of the compressor capability.
The energy and effective working power of an abrasive particle is proportional to its mass and velocity, i.e. E = mass x velocity2. From this equation, quite obviously, a small increase in particle velocity will have a greater effect than a small increase in particle mass.
Poor efficiency at low air pressure is directly related to operating costs of abrasive, compressor hire, diesel, labour and overheads. The dramatic effect is shown as follows:
| 7 bar | 100% |
| 5.6 bar | 60% |
| 4.2 bar | 50% |
Moisture and Oil
All compressors release moisture as a by-product of compressed air. Some compressors produce moisture and oil. All of the moisture produced in the air receivers, air hose and piping will be driven through the lines into your blast pot where it will saturate stored abrasives.
Abrasive blasting equipments biggest enemy is water and oil. The reason is because the water and oil mix with your abrasives and create lumps effectively stopping your abrasives from flowing. The blasts pots metering valves, hoses, nozzles will all get clogged if your moisture problem isn’t attended to. Another problem is if the moisture and oil reaches the surface being cleaned it will provide problems for and coatings that maybe applied later. Moisture could speed up corrosive activity, such as rust. Oil, if it reaches the surface, can cause problems for the future coating to correctly adhere to the surface, such as blistering.
There are three basic things one can do to lessen your moisture and oil risks.
- Cool your air
- Make your air bigger, send the air into a large container with plumbing larger than your supply line
- Slow your air down, giving it time to condense
After-Coolers are radiators placed between the compressor and blast pot. They cool the air in order to condense the moisture; they then trap the moisture before it can be carried to the blast machine.
A moisture separator or trap is installed as close to the blast pot as possible is also useful, it will remove water and oil that has already condensed in the airlines. However, for a separator to work efficiently the temperature must not exceed 10ºC above ambient, if the temperature of the air reaches 55°C or higher none of the separators work at all, as the moisture will remain in vapor form.
Air Lines
Air flows best through straight, hard lines. All directional changes and protrusions will interfere with airflow. Properly sized metal piping or plastic tubing can convey air with minimal friction loss, which tends to be common to rubber airlines.
Try to keep your hoses or piping as short as possible, use only as much airline as needed, and avoid erratic bends. Even correctly sized hoses will lose pressure every 15 meters and just a 90-degree bend will increase the friction slowing your air down causing it to drop pressure at the nozzle. When bends are unavoidable, make them as gradual as possible.
Using the correctly sized airline is critical in order to get the most from your compressor and blast pot. The inner diameter of the airline should be consistent with the inner diameter of all fittings to allow for smooth airflow. Airline inner diameter should also be at least four times the nozzle orifice size.
If choosing between long air hoses and long blast hoses – keep the blast hoses as short as possible.
Minimum Compressor Air Line Diameter
| Nozzle No. | Nozzle Orifice Size | Minimum Air Line ID |
|---|---|---|
| No. 3 | 3/16″ (5.0mm) | 1″ (25.0mm) |
| No. 4 | 1/4″ (6.5mm) | 1″ (25.0mm) |
| No. 5 | 5/16″ (8.0mm) | 1-1/4″ (32.0mm) |
| No. 6 | 3/8″ (9.5mm) | 1-1/2″ (38.0mm) |
| No. 7 | 7/16″ (11.0mm) | 2″ (50.0mm) |
| No. 8 | 1/2″ (12.5mm) | 2″ (50.0mm) |
| No. 10 | 5/8″ (16.0mm) | 2-1/2″ (64.0mm) |
| No. 12 | 3/4″ (19.0) | 3″ (76.0mm) |
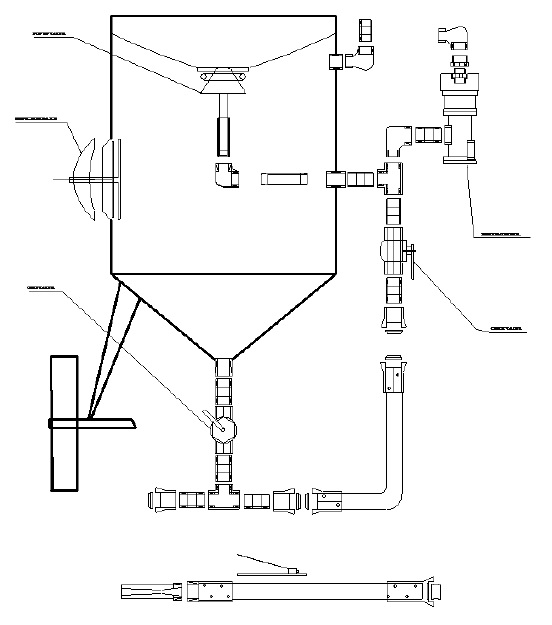
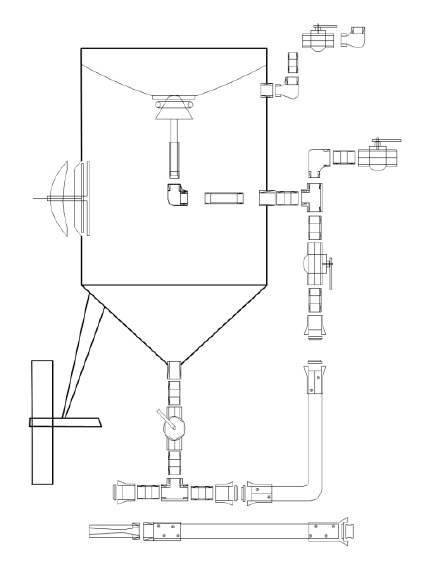
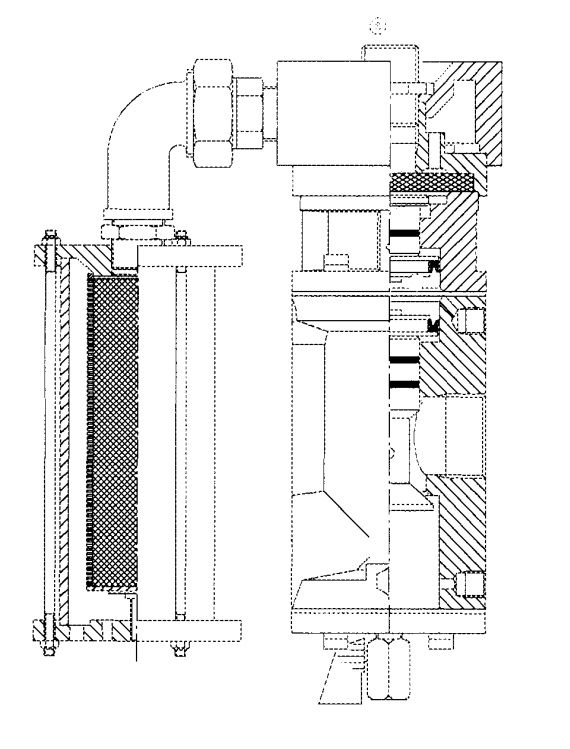
Pressure Blast Pot
The blast pot is a coded pressure vessel that must have a stamp and a certificate that states on it its code and date of manufacture as well as the date of its last pressure test. The blast pot is designed to use pressure to deliver abrasives at a high-speed to a given surface creating as much of an impact as possible. Air enters the blast pot instantly sealing the pot with a pop-up valve; at the same time as air is entering the blast pot air is also sent via a short bit of hose to the tee underneath the pot. The air in the pot and the air in the hose should be equal, allowing the abrasive to flow with gravity into the stream of air travelling to the blast hose. The size of your blast pot has little to do with the volume of air required to blast; it is simply a grit vessel.
For safety reasons inspection bodies approved by the Government should test PBP on a regular basis.
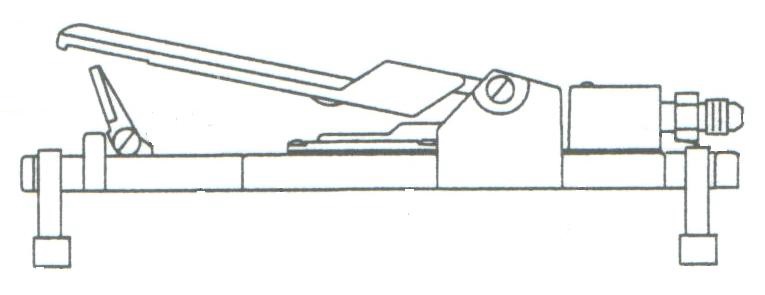
Remote Valve with Dead Man’s Handle
The primary purpose of the dead-man’s handle and control valve is safety. It provides a means to stop the blasting of abrasives from the nozzle when a safety hazard arises. By releasing the dead-man’s handle it will signal the remote control valve to shut off the main airline supply and depressurize the PBP. The control valve must also have an override switch that allows a non-blaster to depressurize the pot at any time. Outside of safety, the remote control and dead-man’s handle allows the blaster to stop and start at his discretion. This removes the need of a dedicated pot minder, instead the pot minder could be utilized elsewhere.
Blast Nozzles
- A nozzle bore shape determines its blast pattern.
- Nozzles generally have either a straight bore or a restricted venturi bore.
- Venturi bore nozzles create wide blast patterns and increase abrasive velocity as much as 100%. Venturi nozzles are the best choice for greater productivity when blasting larger surface areas.
- Long venturi bore nozzles yield approximately 40% increase in blasting productivity compared to straight bore nozzles, while abrasive consumption can be cut by 40%. It’s also a good idea to have angle nozzles available for tight spots like bridge lattice, behind flanges, or inside pipes. Many operators waste abrasive and time waiting for ricochet to get the job done. The little time it takes to switch to an angle nozzle is always quickly recovered and total time on the job is reduced.
Is your air supply sufficient for your chosen nozzle?
As a general rule, the air supply system should be able to provide at least 50%more air volume (cfm) than a new nozzle would need to develop the required practical working blasting pressure, 100 psi or 7 bar. This ensures a nozzle can continue to provide good service even after it is slightly worn. Remember, though, excessive wear should not be allowed or productivity decreases dramatically.
Keep in mind, too, the nozzle entry throat must match the inside diameter of your air supply hose. The wrong size combination can lead to wear points, pressure drop, and excessive internal turbulence.
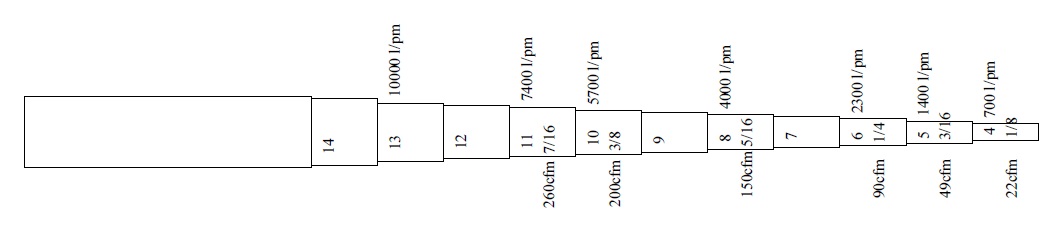
What bore size do you need?
For maximum productivity, select the nozzle bore size based on the desired blast pressure and the available air pressure and flow. For example, assume you are running a 375 cfm compressor at 80% capacity. In addition to the blast-cleaning nozzle, the compressor is supplying air to an air helmet and other components such as air motors and pneumatic controls, leaving 250 cfm available for the nozzle. Referring to the chart overleaf, you can see that 250 cfm is sufficient for a 7/16” nozzle operating at 100 psi. A larger nozzle, or a worn 7/16” nozzle, will require more air flow to maintain 100 psi. This extra flow requirement will either overwork your compressor or decrease productivity.
Abrasive Choice
Abrasives are the materials in blasting that actually do the work. Abrasives can be grouped into three general categories:
Metallic Abrasives
Can be re-used many times before breaking down and are known as recyclable abrasives. It is necessary to recover and screen metallic abrasives for reuse.
Steel grit and steel shot are commonly used metallic abrasives. Steel grit particles have irregular shapes which make them effective for removing rust and mill scale and for roughening the steel. Steel shot particles are rounded, and are good for removing heavy brittle deposits. This abrasive produces a more rounded profile. Blasting with steel shot can cause elongation of light metals, and can drive mill scale and other impurities into the surface.
Non-Metallic Mineral and Slag Abrasives:
Most common non-metallic abrasives are naturally occurring minerals and slag’s (industrial by-products). These abrasives are normally used once and discarded because they break down after blast cleaning. The most widely used non-metallic abrasives are silica sand, boiler slag (from coal furnaces), and smelter slag’s (copper or nickel slag). Other mineral abrasives used in industrial painting are staurolite and garnet.
Special Purpose Abrasives:
Some abrasives fulfill special blasting needs. Corncobs and walnut shells are soft abrasives used to remove light deposits or partially remove a paint layer. Baking soda can also remove soft materials or grease. Other specialty abrasives are glass beads, silicon carbide, frozen carbon dioxide (dry ice) and aluminium oxide.
Characteristics
Abrasives can also be classified by:
- Hardness of abrasives: Abrasives is described as being hard or less hard (soft). The harder the abrasive, the faster and deeper it will cut.
- Size of abrasive: Many abrasives is described by grit size or mesh size. The smaller the number, the larger the abrasive.
- Shape of abrasives: Abrasive particles can be spherical, angular or sub-angular. Spherical or nearly round abrasive particles clean by impact and will produce uniform cleaning on the surface. Angular abrasive particles clean by gouging or cutting into the surface. Sub-angular abrasive particles clean with a combination of impact and gouge. Typically final coatings will require a degree of gouging to allow the paint to anchor to the surface.
How to Specify Blasting
Your coating supplier will always designate the degree of surface preparation required for his materials. The three basic standards used to describe surface preparation are: Steel Structures Painting Council (SSPC), “Surface Preparation Specifications”, the National Association of Corrosion Engineers Standrads (NACE) and the Swedish Pictorial Standards. Basically their definitions are:
SP 7 Brush-off Blast Cleaning Sa1 4 Blast cleaning of all except tightly adhered residues of mill scale, rust and coatings. SP 8 Pickling N/A N/A Complete removal of all rust, mill scale by acid pickling, duplex pickling or elecrolytic pickling. SP 11-87T Power Tool Cleaning to Bare Metal Removal of all visible rust, mill scale paint and foreign matter using power tools and producing a minimum profile of 1mm2.asdasd
| SSPC | Swedish* / ISO | NACE | Description |
|---|---|---|---|
| SP 1 Solvent Cleaning | N/A | N/A | Removal of oil, grease, dirt, soil and contaminants by cleaning with solvent, vapour, alkali, emulsion or steam. |
| SP 2 Hand Tool Cleaning | St2 | N/A | Removal of loose rust, loose mill scale and loose paint by hand chipping, scraping, sanding and wire brushing. |
| SP 3 Power Tool Cleaning | St3 | N/A | Removal of loose rust, loose mill scale and loose paint by power chipping, descaling, sanding, wire brushing and grinding. |
| SP 5 White Metal Blast Cleaning | Sa3 | 1 | Removal of all visible rust, mill scale paint and foreign matter by blast cleaning. |
| SP 10 Near White Blast Cleaning | Sa2.5 | 2 | Blast cleaning until at least 95% of each square inch is free of all visible rust, mill scale paint and foreign matter. |
| SP 6 Commercial Blast Cleaning | Sa2 | 3 | Blast cleaning until at least 2/3 of each square inch is free of all visible residues. |
| SP 7 Brush-off Blast Cleaning | Sa1 | 4 | Blast cleaning of all except tightly adhered residues of mill scale, rust and coatings. |
| SP 8 Pickling | N/A | N/A | Complete removal of all rust, mill scale by acid pickling, duplex pickling or elecrolytic pickling. |
| SP 11-87T Power Tool Cleaning to Bare Metal | N/A | N/A | Removal of all visible rust, mill scale paint and foreign matter using power tools and producing a minimum profile of 1mm2. |
Blasting Techniques
There are three main elements of technique in abrasive blast cleaning:
Stand-off Distance
The distance from blast nozzle to work piece. The shorter the stand-off distance, the more cleaning power the system has, and the smaller the blast pattern becomes. When removing tightly adhering materials like mill scale, use a stand-off distance of about one foot. Increase the stand-off distance to about 2 feet when removing less tightly adhering materials, like old paint.
Angle of Attack
Angle of blasting to the surface. The best angle for blasting depends on the surface and the operation. For rust, mill scale, and heavily pitted surfaces, uses an 80º to 90º angle of attack. When removing old paint, use a 45º to 60º angle. For general cleaning use a 60º to 70º angle.
Dwell Time
Time spent cleaning any particular spot. When removing loose materials, the time can be short. When removing tightly adherent materials, dwell time will be longer.
Tests for equipment in the field
Nozzle Air Pressure (Needle Gauge)
Use the needle gauge to measure the air pressure at the nozzle. Insert the needle into the blast hose just behind the nozzle while it is in operation. Slant the needle into the flow of air through the blast hose.
If the pressure is low, check the following:
- Compressor
- Size and length of air lines
- Size and length of piping lining
- Couplings – are they leaking?
- Size of nozzle
- Blast hose lining
- Clogged pipe on blast pot
Blotter Test
The blotter test checks for water or oil contamination of the blast air. Perform the test by spraying compressed air (no abrasive) onto a blotter (clean, white test paper). If the blast air contains oil or water, dirt marks or splotches will appear on the blotter paper.
Nozzle Throat Test
As an abrasive blast nozzle is used, the abrasives wear down the lining. This increases the diameter of the throat of the nozzle and decreases its efficiency. Check the nozzle throat regularly with a nozzle gauge. To perform this test:
- Use a grease pencil to mark the gauge at the approximate size of the nozzle.
- Insert the gauge in the back of the nozzle, and twist it slightly.
- Remove the gauge and look at the black mark. Where the grease pencil is rubbed off shows the inner diameter of the nozzle.